
Summary
A custom GibbsCAM setup sheet is a Reporter document built from two matched files: an Excel model (.xlsx) that controls the visible layout and a text template (.txt) that tells Reporter which GibbsCAM values and images to place in the workbook.
This article explains how to download CAMCO's sample Mill Setup Sheet, install the file pair, optionally add company branding, generate the report from a prepared GibbsCAM part, and verify the completed setup sheet before it is released to the shop floor.
Table of Contents
- Before You Begin
- How a Custom Setup Sheet Works
- Procedure
- Best Practices
- Video Tutorial
- Troubleshooting
- Related Articles
Before You Begin
Use a supported GibbsCAM installation that includes the Reporter plug-in.
Open a representative Mill part and make sure its part name, machine, material, fixture, tools, program information, coordinate system, and programmer notes are current.
Use an Excel-compatible application when you need to change the setup-sheet layout, logo, print area, or other fixed workbook content.
Close Reporter before copying or replacing report files. Restart GibbsCAM after installation if the new report does not appear.
Keep the .xlsx model and .txt template together and give them the same base filename.
Important: Do not edit the shipped report files inside the GibbsCAM installation folder. Install and customize copies in the user or global Reporter data folder so application updates do not overwrite the report.
How a Custom Setup Sheet Works
Procedure
Step 1 - Download and Extract the Sample
CAMCO sample files: Download Set-up-sheets.zip
Download the CAMCO setup-sheet archive and extract it to a temporary folder.
Confirm that the extracted folder contains GibbsCAM Mill Setup Sheet.xlsx and GibbsCAM Mill Setup Sheet.txt.
Do not rename only one file. If you rename the report, apply the same base filename to both files.
Step 2 - Install the Reporter File Pair
Navigate to the folder correct folder:
Program Files\Gibbs\GibbsCAM\<version>\PlugIns\Data\Report\Copy both the .xlsx model and .txt template into the same Report folder.
Restart GibbsCAM, or close and reopen Reporter, so the custom report list is refreshed.
Step 3 - Add a Company Logo or Other Fixed Content
Make a backup copy of the installed .xlsx model before editing it.
Open the .xlsx model in an Excel-compatible spreadsheet application.
Insert the company logo in an unused area or replace an existing image. Resize it so it stays inside the intended print area and does not cover cells used by Reporter.
Update fixed company text, labels, fonts, colors, row heights, column widths, print area, and page setup as needed.
Save the file as .xlsx without changing its paired base filename.
Note: Moving Reporter target cells, rows, columns, or worksheets may require matching changes in the .txt template. See Modifying Reports before changing the data layout.
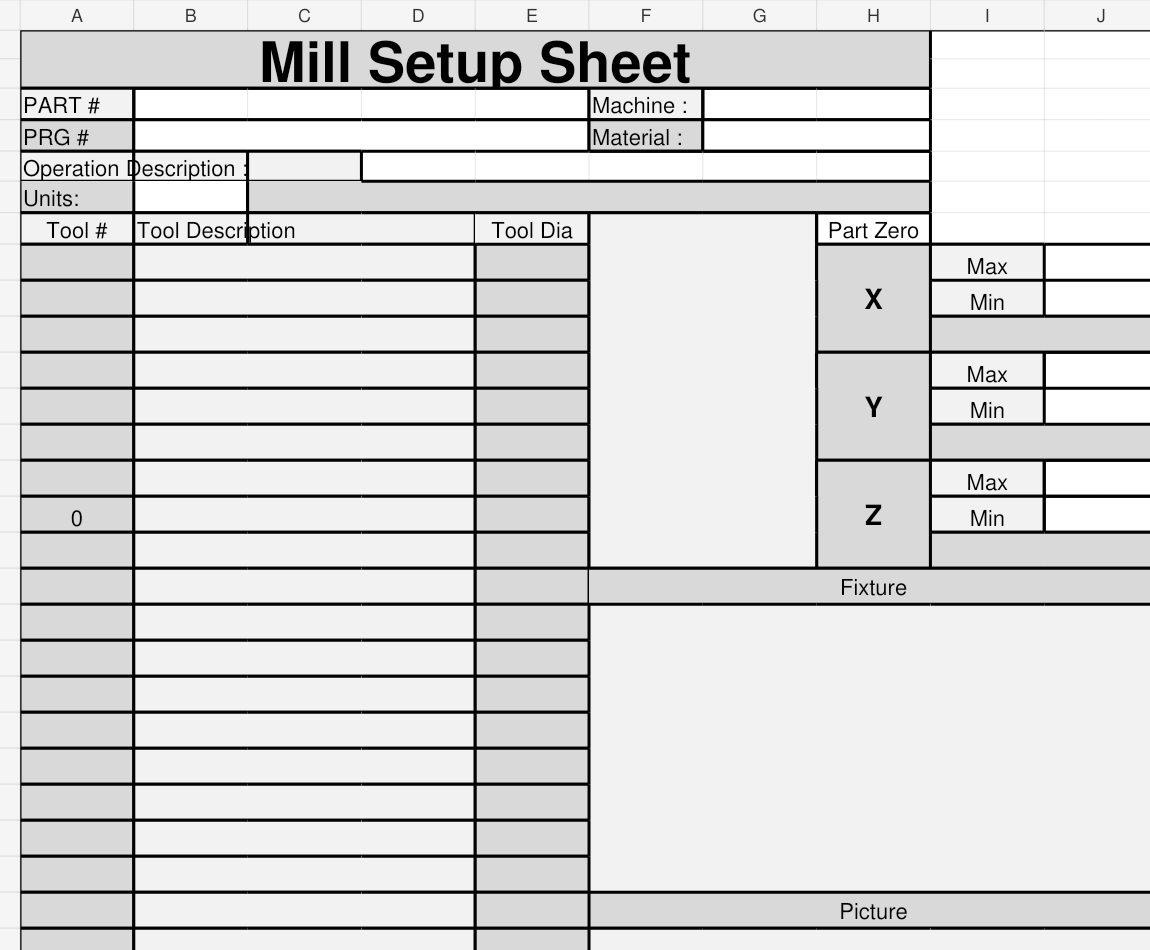
Figure 1 - CAMCO sample Mill Setup Sheet model before Reporter populates the part data.
Step 4 - Prepare the GibbsCAM Part
Open and save the Mill part that will be reported.
Verify the part name, output or program name, units, machine definition, material, and part comments or programmer notes.
Review the Tool List and enter clear tool descriptions and comments that will be meaningful to the setup person.
Confirm the part origin, part limits, fixture definition, and any information expected by the setup-sheet template.
Create or update the part and fixture views that should communicate the setup clearly.
Step 5 - Generate the Custom Setup Sheet
Select Plug-ins > Reporter.
Select GibbsCAM Mill Setup Sheet, or the custom name assigned to the paired files.
Confirm the output path and .xlsx filename for the generated setup sheet.
Select OK and wait for Reporter to create the workbook.
Step 6 - Review and Release the Setup Sheet
Open the generated workbook and review every populated field, tool entry, coordinate value, image, and worksheet.
Check print preview for page breaks, scaling, clipped content, and logo placement.
Compare the setup sheet with the approved GibbsCAM part and posted program.
Save the verified workbook using the shop's naming and revision standard, then print or distribute it through the approved workflow.
Expected Result
The custom Mill Setup Sheet appears in Reporter and generates a branded .xlsx workbook containing the expected part, machine, material, tool, coordinate, fixture, and image information from the active GibbsCAM part. The verified workbook is ready for controlled shop-floor use.
Best Practices
Treat the .xlsx and .txt files as one controlled report definition and always back them up together.
Use a unique report name rather than overwriting the shipped sample so upgrades and testing are easier to manage.
Keep an approved master copy outside the active GibbsCAM version folder and record the revision date.
Test the report with representative parts before deploying it to other programmers or workstations.
Use consistent tool descriptions, fixture names, programmer notes, and program naming so the output is useful without manual cleanup.
Verify the custom report again after a GibbsCAM upgrade or after moving it to a different machine type.
Review the generated workbook and posted program together before release; the setup sheet is only as accurate as the source part data and template commands.
Video Tutorial
Additional Information
Reporter file precedence: A matching report in the user data folder overrides the global data copy, and the global data copy overrides the shipped installation copy.
Troubleshooting
Problem: The custom setup sheet does not appear in Reporter.
Possible Causes
The files are in the wrong GibbsCAM version folder.
The .xlsx model and .txt template do not have the same base filename.
Reporter was open while the files were copied, or GibbsCAM has not been restarted.
A user, global, or shipped copy with the same name is taking precedence.
Resolution
Confirm that both files are paired in the correct version-specific user or global Report folder. Check the filenames, close and reopen Reporter, and restart GibbsCAM. If duplicate names exist, remember that user data overrides global data and global data overrides shipped files.
Problem: The generated setup sheet is missing data or places values in the wrong cells.
Possible Causes
Required information was not entered in the GibbsCAM part.
The Excel model layout was changed without updating the template destinations.
A Reporter command is invalid for the current part or machine type.
Resolution
Complete the missing part, tool, fixture, coordinate, and program information. Compare the .txt commands with the model's target cells, correct any row or column destinations, and regenerate the report with a representative Mill part.
Problem: The company logo or formatting changes do not appear in the generated workbook.
Possible Causes
The generated output workbook was edited instead of the installed .xlsx model.
A lower-precedence copy of the model was changed.
The model was saved under a different filename or file type.
Resolution
Edit the paired .xlsx model in the active Reporter folder, keep the base filename matched to the .txt template, save as .xlsx, then generate a new output workbook.
Problem: The setup sheet prints on extra pages or clips fields and images.
Possible Causes
The print area, scaling, margins, row heights, or column widths changed.
The inserted logo or another image extends beyond the intended report area.
Populated text is longer than the space reserved in the model.
Resolution
Open the .xlsx model, correct the print area and page setup, resize or reposition images, and provide enough space for expected text. Save the model and regenerate the setup sheet before checking print preview again.
Related Articles
- Using the Reporter
- Modifying Reports
- How to Use the Operation Summary
- How to Save and Load Process or Tool Lists
Explore More from CAMCO
Visit the CAMCO website to learn more about:
Keywords
GibbsCAM, Custom Setup Sheet, Reporter, Mill Setup Sheet, Reporter Model, Reporter Template, XLSX, TXT, Company Logo, Setup Documentation, Report Folder, AppData, ProgramData, Reporter File Pair, Shop Floor Communication