
Summary
The GibbsCAM Migration Tool allows you to copy compatible settings and configuration data from a previous GibbsCAM installation to a newer version.
Using the Migration Tool helps preserve your personalized working environment, including user interface settings, custom machine definitions, machine models, and other supported configuration files.
For best results, run the Migration Tool before launching the new version of GibbsCAM for the first time.
Table of Contents
- Before You Begin
- What the Migration Tool Transfers
- Running the Migration Tool
- Related Video
- Troubleshooting
- Related Articles
Before You Begin
Before running the Migration Tool:
Install the new version of GibbsCAM.
Do not start the new version yet.
Ensure the previous version of GibbsCAM is still installed.
Close all running instances of GibbsCAM.
Best Practice: Run the Migration Tool before launching the new version for the first time. This prevents newly created configuration files from replacing settings that could otherwise be migrated successfully.
What the Migration Tool Transfers
The Migration Tool can copy many commonly used settings and configuration files, including:
User interface (UI) preferences
Display settings
Custom MDD (Machine Definition Data) files
Custom VMM (Virtual Machine Manager) files
HSM settings
Bolt tables
Tap tables
Macro configuration files
Machine models
Other compatible configuration files
Only settings that are compatible with the newer GibbsCAM version are migrated.
What the Migration Tool Does Not Transfer
The Migration Tool does not migrate:
Plug-ins
Material databases
Note: While plug-ins themselves are not migrated, Plug-In Manager settings can be transferred to the new installation.
Running the Migration Tool
Option 1 – Start Menu
Open the Windows Start menu.
Navigate to:
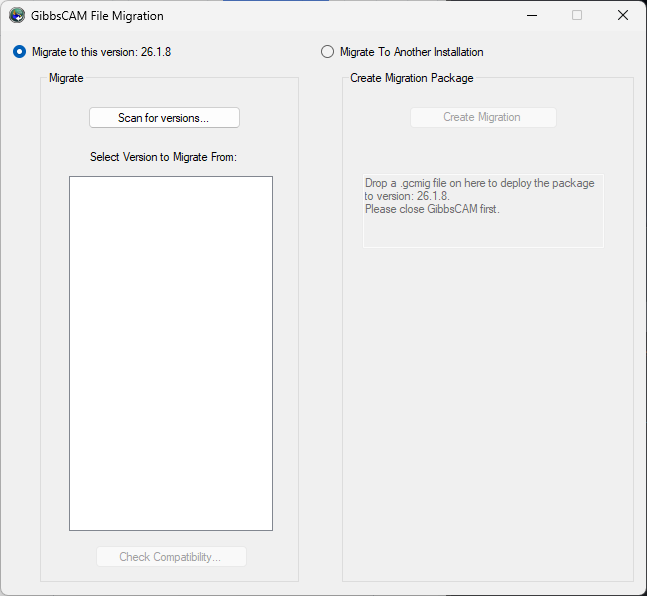
GibbsCAM > Migration Tool 2026.x.x.xLaunch the Migration Tool.
Option 2 – Run as Administrator (Recommended)
Running the Migration Tool with Administrator privileges provides access to all supported files.
Open the GibbsCAM installation folder.
By default:
C:\Program Files\Gibbs\GibbsCAM\<version>\Bin\
Locate:
GibbsMigrationTool.exe
Right-click the file.
Select Run as administrator.
Step 1 – Scan for Previous Installations
When the Migration Tool opens:
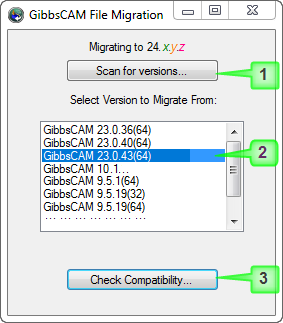
Click Scan for versions.
The tool searches your computer for installed versions of GibbsCAM.Select the version you want to migrate from.
Click Check Compatibility.
Allow the compatibility check to complete.
The Migration Tool verifies which settings are compatible with the current release.
Step 2 – Review the Migration Results
The second screen displays:
Files that can be migrated
Files that cannot be migrated
Review the results before continuing.
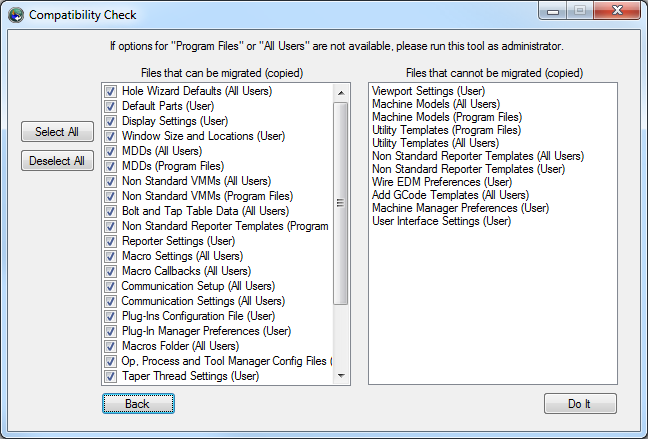
If the tool is not running with Administrator privileges, some protected files may not be available for migration.
Step 3 – Complete the Migration
After reviewing the list:
Click Do It to continue with the migration.
Wait for the process to complete.
Close the Migration Tool.
The previous GibbsCAM installation is not modified during this process.
Step 4 – Launch GibbsCAM
After the migration is complete:
Start the new version of GibbsCAM.
Verify that your settings have been transferred successfully.
Confirm that custom machine definitions, machine models, and other configuration files appear as expected.
Expected Result
The new GibbsCAM installation opens with your migrated settings and supported configuration files, allowing you to continue working with a familiar environment.
Related Video
Best Practices
Run the Migration Tool before starting the new version of GibbsCAM for the first time.
Keep the previous GibbsCAM installation until you have verified that all required settings have been migrated.
Run the Migration Tool as an Administrator whenever possible.
Verify custom machine definitions, machine models, and macros after migration.
Back up important configuration files before uninstalling older GibbsCAM versions.
Troubleshooting
Problem: Previous Version Is Not Detected
Possible Causes
Previous version is no longer installed.
Installation location is not accessible.
Insufficient permissions.
Resolution
Verify that the previous version remains installed and run the Migration Tool as an Administrator.
Problem: Some File Were Not Migrated
Possible Causes
File type is not supported.
File is incompatible with the newer version.
Administrator privileges were not used.
Resolution
Review the Migration Tool results to identify unsupported items. Rerun the Migration Tool as an Administrator if necessary.
Problem: Plug-ins Are Missing
Cause
Plug-ins are not migrated by the Migration Tool.
Resolution
Reinstall the required plug-ins after installing the new version of GibbsCAM.
Problem: Material Database Is Missing
Cause
Material databases are not migrated automatically.
Resolution
Recreate or restore the material database manually if required.
Related Articles
- How to Install GibbsCAM
- Hardware and System Requirements
- How to Perform a Silent Installation or Uninstallation of GibbsCAM
- Download GibbsCAM
- How to Save GibbsCAM Settings
- How to Set a New Default Part
- Network License (NLO) Server Setup
Keywords
Migration Tool, Gibbs Migration Tool, Migrate Settings, Upgrade GibbsCAM, Transfer Settings, Configuration Files, MDD, VMM, Machine Models, HSM Settings, Bolt Table, Tap Table, Macro Configuration, Installation Upgrade