
Summary
This article explains how switchable graphics technology works on laptops and how to configure GibbsCAM to use the dedicated graphics processor for the best graphics performance.
Many modern laptops include both an integrated graphics processor (GPU) and a dedicated graphics processor. While this design improves battery life, it can sometimes cause poor graphics performance, display issues, or instability when running graphics-intensive applications such as GibbsCAM.
Table of Contents
Symptoms
You may experience one or more of the following:
Slow graphics performance
Choppy model rotation or zooming
Poor frame rates during simulation
Graphical display corruption
Blank or black graphics window
GibbsCAM appears to be using the integrated graphics adapter instead of the dedicated GPU
Cause
Many laptops include two graphics processors:
Integrated Graphics – Built into the CPU and designed for low power consumption.
Dedicated Graphics – A higher-performance NVIDIA or AMD GPU designed for graphics-intensive applications.
Windows and the graphics driver automatically determine which GPU an application uses. In some cases, GibbsCAM may be assigned to the integrated GPU instead of the dedicated GPU, resulting in reduced graphics performance.
Objective
Configure your laptop so that GibbsCAM uses the high-performance graphics processor whenever it is running.
Procedure
Step 1 – Verify Your Laptop Has Switchable Graphics
Open Device Manager > Display adapters or Task Manager and confirm that your system has both:
An integrated graphics adapter (such as Intel Graphics or AMD Radeon Graphics)
A dedicated graphics adapter (such as NVIDIA GeForce, NVIDIA RTX, or AMD Radeon)
If only one graphics adapter is installed, this article does not apply.
Step 2 – Configure Windows Graphics Settings
Open Settings.
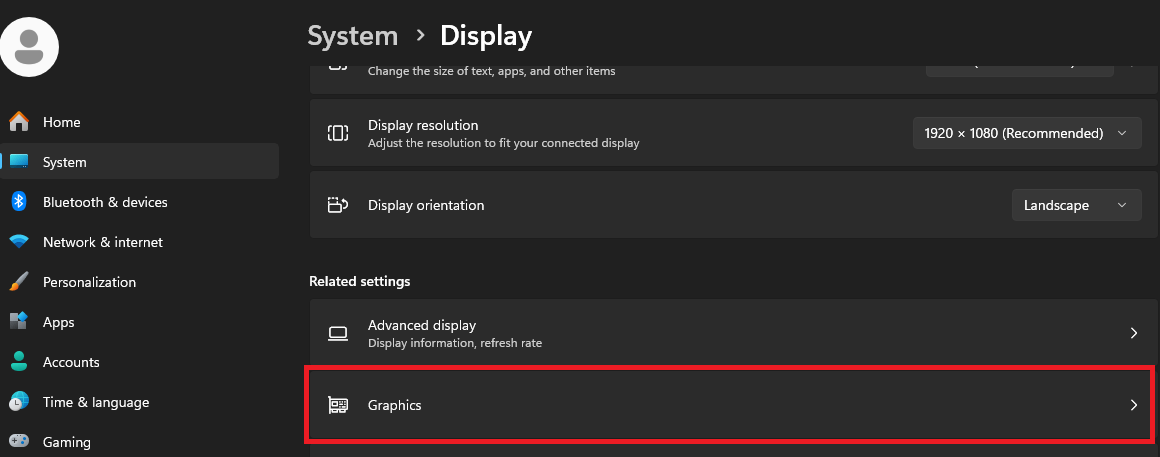
Navigate to System > Display > Graphics.
Add Virtual.exe if it is not already listed.
Located in:
C:\Program Files\Gibbs\GibbsCAM\<version>\Bin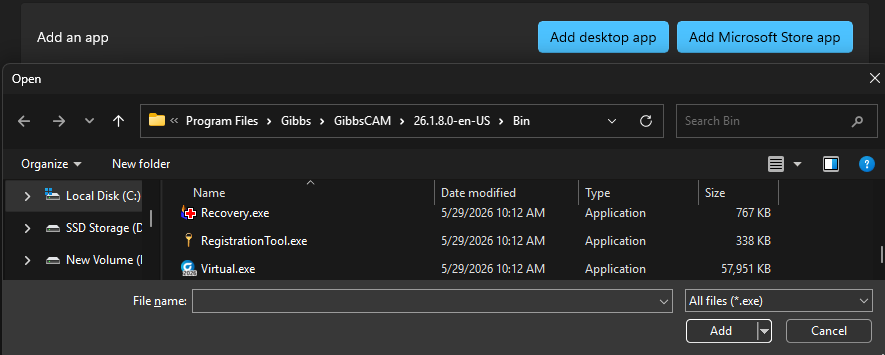
Choose High Performance.
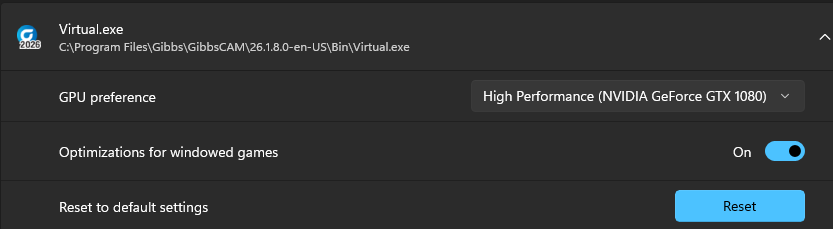
Save the changes.
Windows will attempt to use the dedicated GPU whenever GibbsCAM is launched.
Step 3 – Verify the Graphics Driver
Install the latest graphics driver provided by your laptop manufacturer or graphics hardware vendor.
Avoid relying solely on generic Windows display drivers, as they may not provide optimal performance or support all graphics features.
Step 4 – Restart GibbsCAM
Close GibbsCAM completely and restart the application after making graphics changes.
Some graphics configuration changes do not take effect until the application has been restarted.
Step 5 – Verify GPU Usage
Launch GibbsCAM and open a part containing a solid model.
While GibbsCAM is running, open Task Manager and verify that the dedicated GPU is being utilized during graphics-intensive operations such as rotating, panning, zooming, or simulation.
Expected Result
GibbsCAM uses the dedicated graphics processor, resulting in improved graphics performance, smoother model display, and better simulation responsiveness.
Troubleshooting
Problem: GibbsCAM Still Uses the Integrated GPU
Possible Causes
Windows Graphics preference not applied
Graphics driver outdated
Laptop manufacturer's graphics management software overrides Windows settings
Resolution
Update the graphics driver and review any manufacturer-specific graphics utilities supplied with the laptop.
Problem: Poor Graphics Performance Persists
Possible Causes
Outdated graphics driver
Power-saving mode enabled
Unsupported or entry-level graphics hardware
Resolution
Connect the laptop to AC power, select the High Performance Windows power plan, and ensure the latest graphics drivers are installed.
Problem: Graphics Become Worse After a Driver Update
Possible Causes
Incompatible graphics driver
Driver installation issue
Resolution
Install the graphics driver recommended by your laptop manufacturer or roll back to a previously stable version.
Best Practices
Keep graphics drivers up to date.
Connect the laptop to AC power when using GibbsCAM.
Use the High Performance Windows power mode during machining or simulation.
Avoid running multiple graphics-intensive applications simultaneously.
Verify that your laptop meets the recommended graphics requirements for the version of GibbsCAM being used.
Related Articles
- Hardware and System Requirements
- Troubleshooting Graphical Issues in GibbsCAM
- Using GibbsCAM Remotely with Windows Remote Desktop (RDP)
Explore More from CAMCO
Visit the CAMCO website to learn more about:
Keywords
Switchable Graphics, NVIDIA Optimus, AMD Switchable Graphics, Hybrid Graphics, Dedicated GPU, Integrated Graphics, Laptop Graphics, Graphics Performance, Slow Graphics, Graphics Driver, Windows Graphics Settings, GibbsCAM Graphics