
Summary
GibbsCAM lets you arrange menus, toolbar groups, and command icons around the way you program. Saving that layout as a customization profile creates a reusable .cui file that can be loaded later, shared between programmers who use the same seat, or restored after installing another GibbsCAM version.
This article shows how to save and load a customization profile, make the loaded layout the default interface, use the Migration Tool for other GibbsCAM data, and return to an as-shipped layout when a clean reset is needed.
- Before You Begin
- What the Customization Profile Controls
- Procedure
- Best Practices
- Video Tutorial
- Troubleshooting
- Related Articles
Before You Begin
Finish arranging the menus, toolbar groups, floating toolbars, and command icons you want to keep.
Choose a durable storage location for the profile, such as a backed-up network or cloud folder. The Desktop is convenient for testing, but it is not a long-term backup location.
Save a separate profile for each programmer or task-specific layout when several people use the same GibbsCAM installation.
Close or save active work before installing an update or running the Migration Tool.
Important: A .cui file stores interface customizations. It is not a complete GibbsCAM backup and does not replace migration or backup of posts, machine data, macros, preferences, and other user files.
What the Customization Profile Controls
Visibility and arrangement of command toolbar groups.
Commands added to or moved within menus and toolbars.
Custom toolbars, menu containers, and related interface organization.
Task-specific layouts that you may want to switch between.
Key distinction: Use Save/Load Customization Profile for the interface layout. Use the GibbsCAM Migration Tool when moving the larger set of compatible data from an earlier installation.
Procedure
Step 1 - Save the Custom Interface
In GibbsCAM, right-click an open area in the title or commands toolbar at the top of the window.
Select Customize Toolbars & Menus.
Confirm the interface is arranged as intended. While customization mode is active, normal workspace commands are temporarily unavailable.
At the lower-left of the dialog, select Save Customization Profile.
Browse to a backed-up location, enter a descriptive name, and save the .cui file. Include the programmer, task, or GibbsCAM version in the filename when that will help identify it later.
Select Exit to leave customization mode.
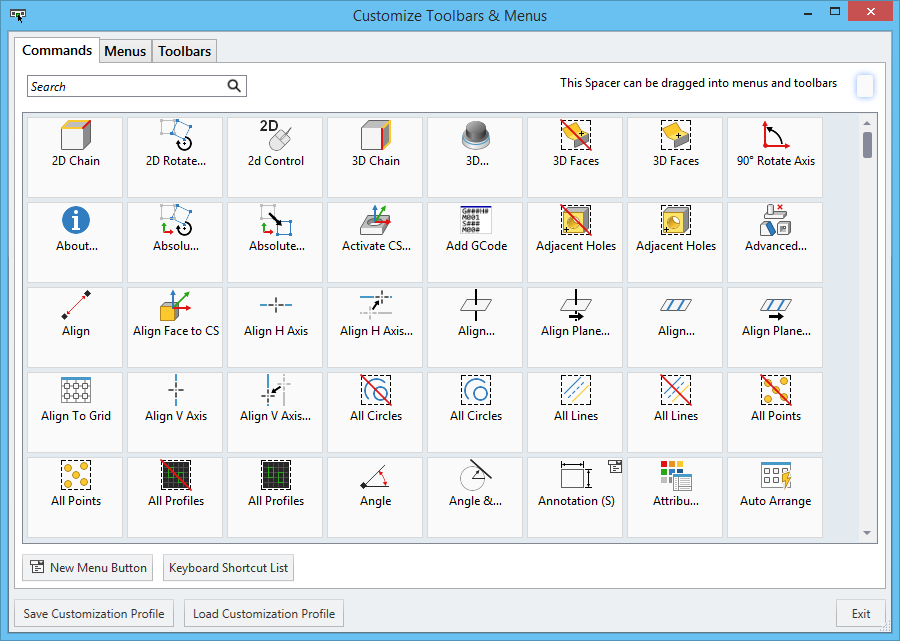
Figure 1 - Save or load a .cui profile from Customize Toolbars & Menus.
Step 2 - Load and Reuse a Saved Profile
Open the GibbsCAM version or workstation where the custom layout will be used.
Right-click the title or commands toolbar and select Customize Toolbars & Menus.
Select Load Customization Profile at the lower-left of the dialog.
Browse to the saved .cui file, select it, and choose Open.
Review the loaded layout and select Exit to return to the GibbsCAM workspace.
Open any GibbsCAM part and save it. This commits the loaded layout as the default interface for subsequent GibbsCAM sessions, as demonstrated in the CAMCO video.
Step 3 - Migrate Other Data After an Update
After installing a new version or update, launch the GibbsCAM Migration Tool if it does not open automatically. It is also available from the Windows Start menu.
Select Scan for Versions and choose the most recent installation that contains the data you want to migrate.
Select Check Compatibility and review which items can and cannot be migrated.
Select Do It to migrate the compatible items, then review the completion results.
Open the new GibbsCAM version and load the .cui profile separately by following Step 2.
Step 4 - Restore an As-Shipped Layout
Open Customize Toolbars & Menus and select Load Customization Profile.
Browse to C:\Program Files\Gibbs\GibbsCAM\<version>\User Interface Layouts.
Select the required preset .cui file. GibbsCAM includes standard Level 1 and Level 2 layouts and a Level 2 Legacy layout for older-style icon placement.
Open the preset, exit customization mode, then open and save a part to retain the selected layout for future sessions.
Expected Result
The saved .cui file can be loaded into a compatible GibbsCAM installation and reproduces the selected interface organization. After the loaded profile is committed, GibbsCAM opens with that layout in later sessions. Loading one of the supplied presets returns the interface to the selected standard or legacy arrangement.
Best Practices
Keep the current .cui profile with your other documented GibbsCAM backups, not only on the local Desktop.
Use filenames such as Morgan_Mill_2026.cui or Inspection_Workflow_2026.cui so the owner, purpose, and version are clear.
Save a new profile after a major interface change instead of overwriting the only known-good copy.
Retain the profile created for the previous GibbsCAM version until the new installation and post output have been validated.
When several programmers share one seat, keep each programmer's profile in a common backed-up folder and load the required profile at the start of the session.
Do not assume the .cui profile contains posts, MDD/VMM files, macros, materials, or all preferences. Back up and migrate those items separately.
Video Tutorial
Troubleshooting
Problem: The saved .cui file cannot be found after an update or workstation change.
Possible Causes
The profile was saved only to the previous computer's Desktop or another local user folder.
The filename or storage location was not documented.
Only the GibbsCAM installation was migrated; the separately saved profile was not copied.
Resolution
Search the original workstation for .cui files and copy the correct profile to a backed-up shared location. If the original profile is unavailable, load a supplied layout from the User Interface Layouts folder and rebuild the customization before saving a new profile.
Problem: The profile loads, but GibbsCAM returns to another layout the next time it starts.
Possible Causes
The loaded layout was not committed after the profile was opened.
GibbsCAM closed unexpectedly before the interface state could be retained.
Another programmer loaded a different profile on the same shared installation.
Resolution
Load the profile again, exit customization mode, open a GibbsCAM part, save the part, and close GibbsCAM normally. If the seat is shared, confirm that another user is not replacing the layout with a different profile.
Problem: Loading a profile does not bring over posts, machines, macros, or other settings.
Possible Causes
A .cui file contains interface customizations, not the complete GibbsCAM environment.
The Migration Tool was not run, or the required source version was not selected.
Some items were listed as incompatible and require a separate update or manual transfer.
Resolution
Run the Migration Tool against the correct source installation and review the compatibility results. Migrate compatible items, then handle incompatible posts, machines, macros, or other data with the appropriate documented procedure or CAMCO Technical Support.
Problem: Commands or toolbar groups are missing after customization.
Possible Causes
A toolbar group was hidden in the customization menu.
A command was moved or deleted while customization mode was active.
The wrong task-specific or programmer-specific profile was loaded.
Resolution
Reopen Customize Toolbars & Menus and enable the required toolbar groups. If a command was removed, restore it from the Commands tab or load a known-good saved profile. For a complete reset, load the appropriate preset .cui file from the User Interface Layouts folder.
Related Articles
- How to Save Settings in GibbsCAM
- How to Migrate Settings from a Previous GibbsCAM Installation
- How to Transfer User Settings Between Workstations
- How to Reset GibbsCAM to the Default Settings
Explore More from CAMCO
Visit the CAMCO website to learn more about:
Keywords
GibbsCAM, Custom Interface, Interface Settings, Customize Toolbars and Menus, Customization Profile, CUI File, Save Layout, Load Layout, User Interface Layouts, Migration Tool, Restore Default Interface, Level 1 Interface, Level 2 Interface, Legacy Interface